Extra LEDs For the Onewheel (Because RGB adds a 15% preformance boost)
-
The beauty of the engineering process!
So, I got the clips to stay on, found the right clip model that works, and it sticks pretty well!
So, I printed this puppy out!


LEDs would mainly face the ground but also back and fourth for the initial design. Need to add some more width so the LED strip and fit inside but it works for a proof of concept.
I stuck a pair on my board without the strips, and just rode through the day.

They looked fine
until..
...
...
...
...
...
...
...
...

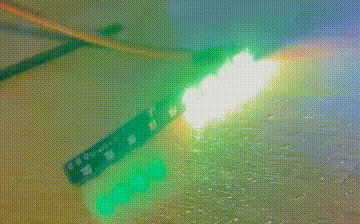
Welp.
So, it got completely olbiterated. The clip also shifted around a lot, and the LED strip would have been shredded into little strips (hah) if I had them on there.The next idea could be under the fender actually.
Kind of like a lighting kit for a car or something.
The only problem would be leaves, dirt and water but I could probably put them in an enclosure or something.I've been thinking about the footpad idea and I might work on that later, maybe during the summer when I have some more time and I have a summer job.
Got the code down, but there's an issue with making the LEDs blink continuously.
No luck with making the code work with buttons and stuff, so I'll have to either ask a programmer friend to cook something up or just keep at itFighting the pavement since I started this hobby!
-
@loaffette what controller are you using with the LEDs? I am more than willing to try and help out with your code!
-
@cheppy44 probably an arduino Nano or something small.
I have an uno that I could use for testing if I can get a printer cable (Not serial/parell) but I wouldn't take it out on a ride and I'm unsure if it works.The code:
#include <Adafruit_NeoPixel.h> int buttonPin = 4; // momentary push button on pin 0 int oldButtonVal = 0; #define pixels 8 #define PIN 3 // Parameter 1 = number of pixels in strip Adafruit_NeoPixel strip = Adafruit_NeoPixel(pixels, PIN, NEO_GRB + NEO_KHZ800); int nPatterns = 2; int lightPattern = 1; uint16_t currentPixel = 0;// what pixel are we operating on uint16_t led=0; unsigned long previousmillis = 0; unsigned long time = 50; // the setup routine runs once when you press reset: void setup() { strip.begin(); strip.show(); // initialize all pixels to 'off' currentPixel=0; // initialize the BUTTON pin as an input pinMode(buttonPin, INPUT); digitalWrite(buttonPin, HIGH); // button pin is HIGH, so it drops to 0 if pressed } void pattern1() { strip.setPixelColor(0, 255,255,0); strip.setPixelColor(1, 255,255,0); strip.setPixelColor(2, 255,255,0); strip.setPixelColor(3, 255,255,0); strip.show(); delay(10); strip.setPixelColor(0, 0,0,0); strip.setPixelColor(1, 0,0,0); strip.setPixelColor(2, 0,0,0); strip.setPixelColor(3, 0,0,0); strip.show(); delay(10); } // Pattern 2 - Red light, all LEDs in the strip are red void pattern2() { strip.setPixelColor(led,0,0,255); strip.show(); led++; if(led == pixels){ led = 0; } currentPixel=0; } // the loop routine runs over and over again forever; void loop() { // read that state of the pushbutton value; int buttonVal = digitalRead(buttonPin); if (buttonVal == LOW && oldButtonVal == HIGH) {// button has just been pressed lightPattern = lightPattern + 1; } if (lightPattern > nPatterns) lightPattern = 1; oldButtonVal = buttonVal; switch(lightPattern) { case 1: if ((unsigned long)(millis() - previousmillis) >= time) { previousmillis = millis(); pattern1(); break; case 2: if ((unsigned long)(millis() - previousmillis) >= time) { previousmillis = millis(); pattern2(); break; } } } } -
I figured the issue you are having with the lights strobing. In your pattern1 you have delay(10) which will only delay it for 10 milliseconds. I changed the 10 to 1000 for one second and here are the results.
I also recommend changing your "time" variable name to something else such as "timer". There are certain variable names that are reserved for other things.
Check out the Neopixel Uber Guide for a bunch of information about the leds and the library. For example you can set the whole "strip" to a color with a single line of code, instead of having to create a function to iterate through the addresses.
https://learn.adafruit.com/adafruit-neopixel-uberguide/arduino-library-use
-
@cheppy44 You are a life saver, holy crap
all I need to do is add a part so if I use a second button, I can control the other four LEDs
-
@cheppy44 good find…. 👍
Typical… NOT available on Amazon UK or EBay UK !!!
Edit…. Found it in RS;)
I think maybe sticking one on the helmet and using voice commands could be an idea, easy to keep PSU and device safe top end (hopefully). -
@puzz360 let me know how it goes! I am tempted to pick a few up to experiment with.
-
@cheppy44 struggling with the code currently. Trying to have two button inputs and two switch functions but nothing is working for the other LEDs
Fighting the pavement since I started this hobby!
-
@loaffette what are you trying to have the buttons change?
-
@cheppy44 if I understand your question correctly, I want one LED to control half of the LEDs (for the left side), and another button control the other half (right side)
Fighting the pavement since I started this hobby!
-
@loaffette ahh ok so you want 1 button each for a left turn and a right turn.
-
@cheppy44 yep!
And I don't know how to get that to work
Fighting the pavement since I started this hobby!
-
@loaffette I am setting up the electronics to try and write the code for it. I might start from scratch with the code, but I can try to explain the code I end up writing! I dont exactly want to rob you of learning how to do this, but it sounds like a fun small project to work on for me.
-
@cheppy44 Thanks man!
I really owe you for this one! I'm pretty bad at programming and this really helps!
I'll probably get around to building a controller for this and designing a mount for the arduino and the LEDs. Found that under the fender is the only safe bet for now, and the footpad would be a pain.May look at doing on the fender itself (On top) could be an option.
Fighting the pavement since I started this hobby!
-
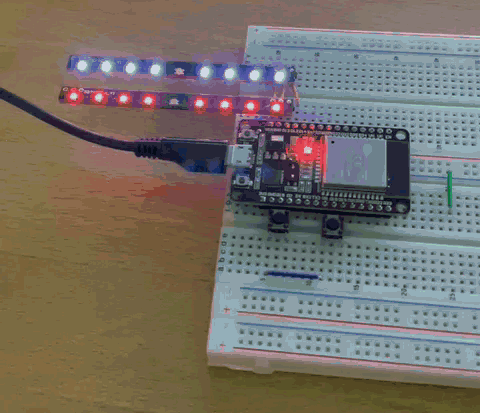
@loaffette here is a demo! still working out a few kinks
-
@loaffette
Here is the code I made! it uses 2 buttons and has 2 outputs for a front and a rear strip. Depending on what controller you use, you may have to set up the button inputs a bit differently. The ESP 32 I am using has Internal Pull up/down resistors for the inputs. I attempted to comment my code pretty good so you can attempt to learn a bit if you feel like it. If you've got any questions or want me to make some changes I am more than willing to help you out!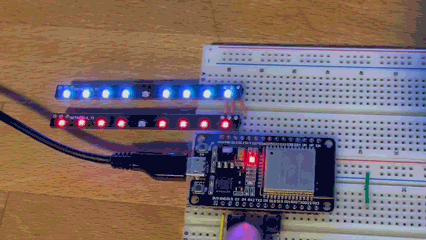
#include <Adafruit_NeoPixel.h> #define PIN1 12 // Pin for Front Strip #define PIN2 13 // Pin for Rear Strip #define BUTTON_PIN1 4 // Pin for Button 1 #define BUTTON_PIN2 19 // Pin for Button 2 #define NUMPIXELS 9 // Number of Neopixels in each strip Adafruit_NeoPixel strip1(NUMPIXELS, PIN1, NEO_GRB + NEO_KHZ800); //Setup for Strip1 Adafruit_NeoPixel strip2(NUMPIXELS, PIN2, NEO_GRB + NEO_KHZ800); //Setup for Strip1 int buttonState1 = 0; // variable for reading the pushbutton status int buttonState2 = 0; // variable for reading the pushbutton status uint32_t white = strip1.Color(255, 255, 255); //Defines a color later to be used in strip1.fill (r,g,b) uint32_t red = strip1.Color(255, 0, 0); uint32_t yellow = strip1.Color(255, 255, 0); void setup() { pinMode(BUTTON_PIN1, INPUT_PULLUP); // Pin for button 1 other side connected to ground pinMode(BUTTON_PIN2, INPUT_PULLUP); // Pin for button 2 other side connected to ground strip1.begin(); // INITIALIZE NeoPixel strip1 object (REQUIRED) strip1.setBrightness(4); // a value from 0 to 255 strip1.show(); // Initialize all pixels to 'off' strip2.begin(); // INITIALIZE NeoPixel strip2 object (REQUIRED) strip2.setBrightness(4); // a value from 0 to 255 strip2.show(); // Initialize all pixels to 'off' Serial.begin(9600); //start Serial console for debuging Serial.println("begin"); } void loop() { buttonState1 = digitalRead(BUTTON_PIN1); buttonState2 = digitalRead(BUTTON_PIN2); // check if the pushbutton is pressed. If it is, the buttonState is HIGH: if (buttonState1 == LOW) { // turn left turn signal on Serial.println("button one left"); strip1.fill(white, 0, 4); //strip.fill(color, first led index, number of leds to fill); strip1.fill(yellow, 5, 4); strip1.show(); strip2.fill(red, 0, 4); strip2.fill(yellow, 5, 4); strip2.show(); delay(500); //delay for 500 milliseconds or .5 seconds strip1.fill(white, 5, 4); strip1.show(); strip2.fill(red, 5, 4); strip2.show(); delay(500); } if (buttonState2 == LOW) { // turn right turn signal on Serial.println("button two right"); strip1.fill(yellow, 0, 4); strip1.fill(white, 5, 4); strip1.show(); strip2.fill(yellow, 0, 4); strip2.fill(red, 5, 4); strip2.show(); delay(500); strip1.fill(white, 0, 4); strip1.show(); strip2.fill(red, 0, 4); strip2.show(); delay(500); } else { // turn leds back to "normal" //Serial.println("normal"); strip1.fill(white, 0, 4); strip1.fill(white, 5, 4); strip1.show(); strip2.fill(red, 0, 4); strip2.fill(red, 5, 4); strip2.show(); } delay(50); } -
@cheppy44 thanks man!
This really helps me out with getting this going!
I'll give the code a spin in Tinkercad when I have time later tonight! -
Got the button code translated to work for the Arduino! Just had to change (INPUT_PULLUP) to (INPUT).
Tinkercad simulator is a bit broken though currently, and it's running slow. I'm gonna go and try to find a USB cable for the arduino and test it using real hardware instead.
Again, thank you so much for helping me out with the code!
-
No dice yet.
The arduino isn't recognizing the button press.Gonna try and see what I can chagne or what I can do
Changed the
} if (buttonState2 == HIGH) {
to LOW instead of high, and found that when I hold it down, it pauses the flashing -
@cheppy44 So I messed around a bit with the code to try and make it work
Added a fuction that would print to the console if button two wasn't pressed.
I don't have anything plugged into the pin for button 2 or 1 and it's reading that button one is pressed..Could my arduino be messed up?
what board are you using, I might try and buy the board you have instead.
Also, when I have the button plugged in and I hold it down, the LEDs stop flashing but are stuck on redFighting the pavement since I started this hobby!